Saturday, March 30, 2019

Best Low Carb Cauliflower Pizza Crust

This pizza is easily my favorite low carb pizza.  I know fathead dough is very popular, and I do like it, but I also feel kind of "heavy" when I eat those cheese based breads.  


This one doesn't make me feel that way, I feels so clean and tastes amazing.  

If you follow the instructions to a "T" you'll get a nice crust, not soggy at all.  It's sturdy enough, but don't expect it to be hard and crispy like "normal" pizza crust...because it's cauliflower...so there's that. ;)
Here is the link to the printable... CLICK HERE.  Scroll all the way the bottom and hit print page. ;)

FAQ:

1.  Can I sub something for that goat cheese?  YES!  You can sub cream cheese here.

2.  Do I have to use Nutritional Yeast Flakes?  No!  :)  It'll be tasty and yummy without it, but it does add a nice cheesy/yeasty taste in my opinion....besides, did you know that nutritional yeast flakes are super good for you?  That's right, they are high in protein, B vitamins and trace minerals.

3.... do you have a question?  Feel free to ask! 

Here are pictures with captions, because everyone likes those...ha ha!

This is "half" the recipe.  I like to make two crusts, one to freeze for later, one for now.  This size crust will kind of stuff you once it's topped, so I think a "normal" serving would be 1/2 - 3/4ths of this. ;)


I like to prepare the crust on a parchment paper lined flat baking sheet then slide that onto the HOT preheated stone.  When I take it out of the oven to put the toppings on, I leave it ON the hot stone, so it is still kind of crisping up as I top it.

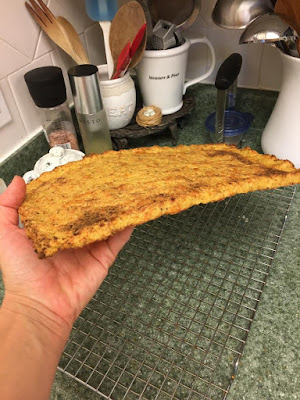
You can see how nice and sturdy it is (the full size round pizza will probably not hold up as well to being picked up like this!).  The bottom is nicely browned.

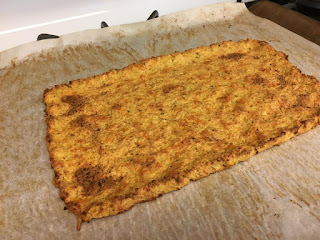
Just another photos to show the color you are looking for when it's "ready". :)

Just out of the oven and ready to be sliced.  I sliced this one into 4's.  My toppings here are:  Homeade sauce, mozzerella, parmesan, black olives, yellow bell pepper, onion, pepperoni, and fresh basil.  Add anything though!  Go wild. ;)
  
Notice it's a thin crust, if you go thicker than this it will not set nicely and it will become more soft.  I like to make these "crust" type edges though!

Monday, November 26, 2018

Low Carb Chocolate Cream Pie

... need I say more???  This pie was incredible!  Seriously delicious...so good!  I made it for our Thanksgiving dessert and it was over the top delicious.  That is all, have a good day, lol.


I'll save you all the useless chatter and send you directly to the recipe. :)  Please scroll to the bottom of that page for the "print page" option.  :)


Saturday, October 20, 2018

Fudge! Low Carb - Keto - Delicious!

This fudge recipe is based on one that gets great reviews, however, it calls for evaporated milk, which is higher in carbs (sugars) than I would like.  

My daughter-in-love first made this fudge (with a couple of her own personal alterations), then passed it on to me.  I made further alterations, including hers to get this result. :)  

The original "inspiration" recipe is linked in my final recipe here...

CLICK HERE --- >   BEST LOW CARB FUDGE!

(NOTE:  To print the recipe, simply scroll to the bottom of the page and click the print option)


Thursday, June 7, 2018

Low Carb Meatballs in Bechamel Sauce


Because I love Italian food so much! 

Meatballs are almost naturally low carb...except for that "bread crumb" ingredient...oy!  But, fear not!  These meatballs are perfectly juice, tender, delicious AND low carb, because their "bread" content is made from my Best  Low Carb Buns! :)

This is one of our absolute favorite meals...ever!  It's decadent, rich, filling, tasty, it's everything Italian food should be.  I serve this with a good size green salad.

Here's what you'll need:

1 recipe Low Carb Bechamel Sauce (or 1/2 a recipe depending on how many people you want to feed!)

1 batch Low Carb Meatballs
Thin slices of soft mozzarella
Grated Parmesan for topping
Maybe some leftover Best Low Carb Buns for sopping up that bechamel sauce!
How about a little fresh sliced basil to make it pretty? :)

Preheat oven to 375.

Prepare your baking dish (or single serve dishes) by rubbing with olive or avocado oil.  
Spoon a small amount of bechamel sauce onto bottom of dish.  
Place desired number of meatballs in dish (I served one too many for each of us, so don't get carried away like we did, lol)


Top with both cheeses.  Bake, uncovered, for 15 minutes.
Turn on broiler (make sure you dish is broiler safe!) and broil for 2-3 minutes or just until the cheese begins to bubble and turn golden.


There.  You're done.  Go eat! :)  Light a candle, put on some Italian music, swoon at your honey. :)


Best Low Carb Buns


I based this recipe off of one that I found from LowCarbMaven.

I've made these several times, tweaked and tweaked, and have finally come up with what I feel is the "perfect" mix for the right texture and taste.  These buns hold together, have a slight yeasty taste (thanks to the addition of Nutritional Yeast), and are filling! :)  

For the printable recipe go HERE, then scroll to the bottom for the print page option.

They are extremely versatile and can be made into panini's, breadsticks and more!  Please see bottom of post for baking options.

What you'll need:

"wet":
1 1/2 C. shredded cheese (I use part skim mozzarella, but cheddar or fiest mix work well too!)
2 oz cream cheese
1 large egg, plus 1 large egg white

"dry""
3/4 C. blanched almond flour (fine ground)
2 Tbsp. Coconut flour
1/3 C. Whey Protein Powder (unflavored)
1 Tbsp. baking powder
1/2 tsp. Xantham gum (optional, but helps with holding the buns together)
1 Tbsp. Nutritional Yeast Flakes (NON-GMO!) - run through a sifter or sieve to make fine
1 Tbsp. Unflavored beef gelatin powder
1/4 tsp. fine grain salt
2 Tbsp. Golden Flax Meal

In a medium bowl, mix all your dry ingredients together with a whisk, set aside.

**Melt shredded cheese and cream cheese together by using one of the following two methods:

A.  In  medium/large microwave safe bowl, heat for 1 minute, stir and heat an additional 30-45 seconds or until melted and will stir together with a fork.

OR

B. Over the stovetop in a small saucepan over low heat, heat the two cheeses until melted and smooth.

Whip the cheeses into a smooth mass with a fork, work quickly!  Use your muscles!  Add in the egg and egg white, and continue to whip it up... it will be thick and rather difficult, but eventually you will get them all combined together.

Pour dry ingredients into cheese egg mixture, mix as well as you can with the fork, then move to slightly dampened hands.  It will be a sticky mess... this is normal! :)
Mix with your hands to sort of knead it all together in the bowl.  Scrape sticky blob onto plastic wrap and wrap it up nicely.  Place in freezer while the oven heats up (the chilling is important here).

Preheat oven to 400 F.  Line a baking sheet with parchment paper.

Once the oven is ready, take the dough out of the freezer and with oiled or slightly damp hands, form 5 round buns, flatten slightly, but not TOO much.

Bake 12 minutes or until the outside has lightly browned.  Let them cool 2 minutes, then remove to a cooling rack, to cool.  For softer buns, cover lightly with a lightweight clean kitchen towel while they cool.

These freeze well and store nicely in the fridge for about a week or so.  I keep them stored on the counter for up to 3 days.

Optional baking ideas:

*Instead of forming buns, flatten mass into a rectangle and use fingertips to dimple... bake and cut into squares for paninis!
*Instead of bun shapes, make 10 breadstick shapes.  After baking, while still hot, brush with melted butter, olive oil and garlic powder!
*Make into smaller buns for dinner rolls, brush hot rolls with melted butter and garlic.
*I use 1-2 buns all crumpled up as a base for tender delicious meatballs! :)

Saturday, June 2, 2018

Low Carb Cauliflower Bacon Spinach No-Mac n Cheese

This dish is over the top amazing!  Oh YUM!


Let's get right to it, shall we? (For the printable Recipe, go to bottom of page)


You'll need:


1 Head Cauliflower, cut into bite size florets
4-6 slices of bacon, cut into small pieces
3 heaping cups of fresh spinach leaves, chopped small (measure before chopping)
2 cloves garlic, minced
3/4 tsp. Sea Salt
1/4 tsp. Fresh Ground Pepper
1/8-1/4 tsp. Smoked Paprika (to your own tastes)
1/2 tsp. Dried Basil
1/2 Heavy Cream
1/8 tsp (scant) Xantham Gum (Optional)
2 oz cream cheese cut into chunks
1 C. shredded sharp cheddar (I used Kerrygold Dubliner)
1/3 cup shredded Asiago or Parmesan (or cheese of choice)


Set cheeses and cream out on counter to "warm up" a bit. ;)

In a large ovenproof skillet (Cast Iron is great!), brown bacon pieces until just crisp and brown.  Remove bacon from pan with slotted spoon, set aside.  Add cauliflower to hot pan drippings and stir to coat.  Cover pan with lid and allow cauli to steam for 4-6 minutes (stirring occassionally), until just crisp tender. 

While Cauliflower steams, finely chop the cooked bacon and mix it with the shredded Asiago (or Parm) cheese and set aside.

Remove lid, reduce heat to med-low,  season cauliflower with salt, pepper, smoked paprika, basil and garlic, stir.   Add cream to pan and stir to coat.  IF USING, sprinkle the Xantham Gum over the dish evenly, then stir to incorporate.

Turn on Broiler to heat it up!

Add the cream cheese to the pan and stir until melted and smooth.  Sprinkle cheddar cheese, a little at a time, over the top, stirring well until melted, repeat, using all cheddar cheese.  Stir well to cover all the Cauliflower in yummy creamy cheese goodness. :)  Finally, add the chopped spinach to the dish and stir to incorporate well, making sure everyone gets a nice coating of cheezy goodness.

Sprinkle the top with the bacon Asiago mixture and place pan under broiler for 2 minutes.  Eat this deliciousness!!!  :)


Printable right HERE!

Sunday, January 7, 2018

Lower Carb / Lower Sugar Apple Crumble with "Mock Ice Cream" Topping

This is one of my favorite treats to make on a chilly evening.  Apples are naturally sweet, but the addition of a touch of maple syrup, Monkfruit sweetener and stevia set the balance "just right".  It has all the elements of a traditional apple crisp or crumble with no refined sugars and much less carb count.  

Pop over to my recipe page,  HERE to get the easy printable.

Simmer apples in sweetener, cinnamon and vanilla, until "just" tender.


Meanwhile, mix up the crumble topping!

Whip some cream with stevia and vanilla

 Pop it in the freezer to chill into "mock ice cream"

Evenly distribute apples...

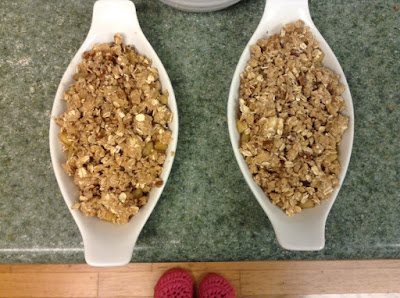
 Top apples with crumble mixture

After crumble has baked, top with "ice cream" and enjoy! :)

Friday, December 22, 2017

The BEST Coconut Flour Chocolate Cupcakes EVER

I adapted these from my favorite chocolate cake recipe, which calls for 2 cups of flour and 2 cups of sugar.  Now that we are eating low carb and sugar free I just had to recreate this recipe.  I can now check that off my "Bucket List". 

Grain Free, Sugar Free, Nut Free...and oh so delicious!  Wow.

Scroll through the pics to see how I assembled them... go to this link to grab my recipes for the cupcakes, ganache and frosting.  Enjoy!


Related Posts with Thumbnails