


Pop down to the bottom of the page for a few "questions answered".
While I was on vacation, I picked up a loaf of "Rudi's Organics - Olive Oil and Rosemary Bread" at an Ingles supermarket in North Carolina. It smelled fantastic right through the plastic, so I knew I had to have it.
That night I made Chicken n' Dumplin's and I broiled a few slices of this bread brushed with Olive Oil - My darling husband was lovin' it!
Chicken Phillies! Yum.
Chicken Phillies! Yum.

This bread takes some sponging time (The best results I've achieved are when I let it sponge overnight on the top of the fridge, but you can sponge for less time if you want). I like to mix mine up in the evening, then bake it in the morning. However, you can mix it up first thing in the morning, and bake in the afternoon as well.


What you're gonna need:
4 TBSP. Extra Virgin Olive Oil
3 TBSP. minced fresh Rosemary (don't use dried in this recipe)
1 C. 2% Milk - Warm, but not hot - like a nice bath - about 110 degrees
2 C. White Whole Wheat Flour
1/2 C. Unbleached Bread Flour (I used King Arthur)
1 1/2 tsp. Instant Rise Yeast (Fleishmans for bread machines)
1 1/2 tsp. sugar
1 tsp. large grain salt (Kosher or Sea)
1/2 tsp. freshly ground pepper
First, Create a "sponge"...
In a medium sized bowl mix 2 C. Wheat Flour, and all the Yeast; stir in the warm milk until well mixed.

It'll be kinda thick, like this...

Cover bowl snugly with plastic wrap and set in on top of your fridge, or another warm place to sponge for several hours.

 When you're ready to start making bread, take down the bowl and remove plastic.
You'll notice it's a little bit puffy now because it rose during those hours, then settled.

Stir in the oil, chopped rosemary, salt, pepper, and sugar.

It'll be gloppy, like this.

At this point, turn your oven on to WARM, when it's ready, turn it off. You are trying to get it to about 85 degrees.
Using the 1/2 cup of Bread Flour, sprinkle your counter well, and dump the dough on there...
 Knead the dough until you get a nice soft bundle, adding more of that 1/2 cup as needed (you'll most likely use it all). Keep kneading for 7-10 minutes or until you have a nice pliable, elastic feeling dough ball. If you need to add a little more flour, it's ok to do that, but don't let it get stiff.
The key is for your dough to be soft and elastic, where it almost wants to stick to your hands but not quite sticky. The less flour you add (without having a sticky mess) the more tender and moist your bread will turn out.
Once your dough is pretty (like below), form it into a loose ball. Rub a little oil on the counter and coat the ball, then invert your bowl over it. Let it sit 10 minutes. Punch dough down and let it rest 5 more minutes, covered.
 Uncover your dough and make a round loaf by turning the ball in your hands and tucking under toward the bottom, giving it a smooth top. Rub it all over with a light coating of olive oil, and set it on a baking sheet covered in parchment paper.
  Cover with a lightweight kitchen towel and slip it into the warm oven (about 85 degrees) to rise for about 25 minutes.
 Remove from oven and treat gently so it doesn't collapse. If you have a baking stone, put it on the LOWEST rack in the oven, crank it up to 375. It's always a good idea to preheat your stone.
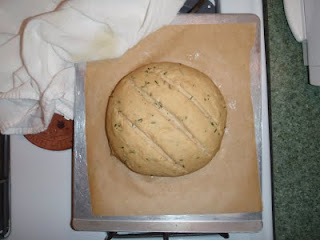
Here is the risen loaf... 
Now, take a VERY sharp knife or blade (I use a razor blade) and slit it three times, or you can get fancy and carve your initials in there...kidding! Don't deflate your lovely loaf! The gashes should be about 1/4 inch deep.
(OPTIONAL)
Whip an egg white with a tsp of water and brush this over your loaf before baking!
(OPTIONAL)
Whip an egg white with a tsp of water and brush this over your loaf before baking!
Once the oven is ready, slide your bread (and parchment paper) onto the stone. Bake for 15-25 minutes or until internal temp. reaches 190 degrees. I always insert my digital temp probe after baking for 15 minutes, then I let the probe tell me when the bread is done.
 (It's ready when golden brown and sounds hollow when tapped on bottom)
NOTE: The loaf in the photo was brushed with egg whites for a shiny finish, yours won't look exactly like this, unless you do that.
Remove bread to cooling rack immediately and cool completely before slicing - this is HARD to wait for, but it's the best thing to do for a nice texture!
Now for some answers to your questions...what no questions? Ok, here's some info anyway...
1. What's the big deal about White Whole Wheat? This is the best whole wheat flour I've ever worked with because it is milled from a soft grain, and milled nice and fine. So, it performs almost just like white flour (ALMOST, but nothing beats while flour for pancakes!). If you use regular whole wheat, your loaf may come out heavy and dense.
2. Why should I use extra virgin olive oil? Actually there's a lot more to it than that. I only buy Extra Virgin Olive Oil that says it is from the FIRST COLD PRESSING, this ensure that the oil has not heated up from the processing and lost is valuable flavor and nutrients. I ALSO only purchase oil that SAYS it has been packed in Italy. If your label says (select oils from Italy, Spain and Tunisia,...) BUT doesn't say it's packed in Italy, then after it's shipped to the USA in big vats, it is most likely "dulled" down by a percentage of vegetable oils before being bottled.
3. How do I knead bread? Kneading is easy, AND relaxing. Simply fold the top part of your dough down in the center and press it into itself with the heel of your hand, then turn it a quarter of a turn and do it again, and again, and again, until you achieve the soft elastic feel.
4. What's the Sponge for? This gives the bread a light airy texture and a slightly "sourdough" flavor, but not a TRUE tart sourdough flavor.
Any more questions? Just ask! :)
Have a beautiful day!


5 comments:
me gusta tu blog y tus fotografias de los alimentos !
un beso
Sounds yummy! I used to live where we had rosemary growing in the yard as "landscaping". Now I have to search for fresh rosemary in the store. (sad face) I'll be trying this recipe as soon as I find some fresh.
I might just have to attempt homemade bread for this one! And I do have fresh rosemary growing in the front yard - yay!
So pretty! I love all the photos, it almost makes me want to cook! LOL Awesome.. I will be checking back from time to time. :)
I am new, but this looks like a recipe I would like to try.
Hope your family had a wonderful Christmas and New Years!
Post a Comment